Healthy Snacks: Kale Chips

The first time we had kale chips was during a trip to San Francisco a few years back, and we’ve been hooked ever since! There are delicious store-bought ones (Solar Raw Food makes amazing Better than Cheddar kale chips covered with bell peppers and cashews that taste just like cheese!), but they’re usually pretty pricey. Homemade kale chips are a lot less expensive and really easy!

Kale Chips

Before: Ready to Bake

Kale Chips

After: Kale Chips! 

Ingredients

  • A bunch of kale
  • 2 tbsp of olive oil
  • Salt or other seasoning to taste

Directions

  • Cut or rip the kale leaves off the stems, then tear the leaves into smaller bite-sized pieces
  • Wash the leaves and dry thoroughly
  • Once dry, put all the leaves into a bowl and toss with olive oil and salt
  • Spread evenly on a baking try lined with parchment paper, foil, or baking sheet
  • Bake in the oven for 20 minutes at 300°F

Tips 💡

  • Make sure the leaves are completely dry! Any moisture will make the kale soggy. In addition to air drying the kale, we used a salad spinner and paper towels.
  • You don’t have to tear the leaves into bite-sized pieces, but it makes it easier for the kale to crisp in the oven.
  • Try not to stack/layer any leaves on top of each other while baking because it’ll prevent them from crisping.
  • Some people suggest adding salt after the kale is baked (salt draws out the moisture from the leaves and can make them soggy).

Where We Ate: Gusto 101

This past month, Matt got shingles. It was the first time in almost a decade together that I’ve ever seen him that unwell. For him, it was debilitating in the form of extreme headaches and discomfort, so he was in bed for a good week. During that time, it really made me miss and appreciate all the things he does at home and to take care of me.

With all that said, I was ecstatic (and relieved) when he was finally feeling better this week, so we went out to celebrate at Gusto 101. The restaurant only takes a limited number of reservations each day, but we managed to grab a couple of skylight bar seats on the rooftop patio.

Source: Gusto 101

Rooftop Patio (Source: Gusto 101)

It was perfect weather for patio dining (and for sangria and beer), and the food definitely hit the spot… so yummy!

What We Ate:

Arancini (green pea risotto and buffalo mozzarella with red pepper sauce)

Arancini

Arancini

Rigatoni Lucani (rigatoni with braised lamb, tomato, and green olives topped with pecorino and gremolata)

Rigatoni Lucani

Rigatoni Lucani

Diavola Pizza (pizza with spicy sundried tomato pesto, calabrese salami, 
smoked provolone, and roasted peppers)

Diavola Pizza

Diavola Pizza

Gusto 101 hasn’t disappointed yet!

Gusto 101 on Urbanspoon

Easy Plastic Wrap Poached Eggs

We’ve tried a few ways of poaching eggs, including using an egg poacher and the swirling method, but I personally like the plastic wrap method the best—it offers consistent results and pretty perfectly poached eggs (the homemade kind, anyway).

Instructions

  1. Line a ramekin or small bowl with a small sheet of plastic wrap.
  2. Brush a few drops of oil (I used olive oil) onto the cling wrap and add any herbs or spices.
  3. Crack an egg onto the plastic wrap.
  4. Bundle the egg in a little package, tying the top with twine (I didn’t have any, so I improvised with our silicone food ties).
  5. Put the bundles into boiling water, and boil for 3 to 4 minutes.
  6. Pull the bundles out, unwrap the eggs, and serve!
Notes:
  • The oil prevents the egg from sticking to the plastic wrap; it should slide off easily when you unwrap the packages.
  • When bundling the egg, try to minimize the amount of air inside because it’ll make part of the package stay afloat, which causes it to cook unevenly. This happened to me, so I used a spoon to submerge the package and to turn it over.

What You'll Need wpid-20140622_140138_1.jpg

Easy Smoothies: Mint + Watermelon + Frozen Banana

When it comes to smoothies, the options are endless! I was apprehensive about the watermelon-banana combo, but it turned out to be delish 🙂

Blend!Sunday Smoothies!

Ingredients*

  • 1 cup of watermelon, cubed
  • 2 frozen bananas
  • Leaves from ~2 sprigs of mint
  • 1 cup of coconut water

*These are the amounts I used for our 2 smoothies, but the beauty of smoothies is that you can adjust everything to your liking!

Directions

Put all the ingredients into the blender and blend until smooth!

Sushi-Making at Wabora: Fun, but Not Worth It

This past Saturday, Matt and I headed to the Thompson Hotel to try a buytopia deal: $40 for a 2-hour sushi-making class at Wabora. The verdict? Meh. Don’t get me wrong—it was a fun date activity, the chefs were friendly, and we learned some basic sushi-making tips, but I personally don’t think it was worth the $40.

In any case, we still had a good time. Matt is definitely more creative than I am when it comes to (his are the two on the top in the photo below)! I was pretty preoccupied with not slicing all my fingers off with the sharp sushi knife, so thankfully, I came out with all 10 intact. ^^’

wpid-photogrid_1402879794518.jpgwpid-photogrid_1402880278469.jpg

What We Made

  • Chicken Teriyaki Roll: A grilled chicken, cucumber, carrot, and avocado roll topped with miso sauce and teriyaki sauce
  • Crispy Crunch Roll: A crabmeat, cucumber, and avocado roll topped with spicy salmon, crispy shredded potato, spicy mayo, and sweet-spicy sauce

Would I go again or recommend it to others? Maybe not. But I’ll end with this: it reignited my appreciation for sushi chefs because I got to witness first hand that it’s not as easy as it looks. Sushi-making requires practice and skill, and for those who’ve watched Jiro Dreams of Sushi, it can be an art. It’s something I’ll have to remember the next time we go out and have amazing sushi!

Wabora on Urbanspoon

4 Easy Herbalicious Recipes!

herbs

Now that the weather has finally been getting better, I’ve finally started a little herb “garden” at home. My awesome coworker V gifted me some sweet Thai basil, and we’ve recently added regular basil to the mix. Mint is next on the list! Matt and I have been making the most of basil and mint lately, so I thought I’d share 4 easy recipes:

freezies

1. Mint-Watermelon Tequila Freezies: Inspired by this Buzzfeed list (I literally want to make everything on there), which cited this recipe from Hungry Girl por Vida. Mint? Gooood. Watermelon? Gooood. Tequila? Even better! This was SO easy to do and perfect for our weekend at the cottage.

gin-tonic

2. Mint-Cucumber Gin & Tonic: I am very much a gin and tonic girl. While I usually just have it with a bit of lime, muddling some mint and cucumber makes for an awesome and super easy-to-make refreshing summer drink!

caprese-salad

3. Insalata Caprese (Caprese Salad): Matt made this salad with his homemade spinach burger patties and steamed sweet potatoes. We didn’t follow a recipe, but it’s pretty simple: layer sliced tomatoes, sliced fresh mozzarella, and basil, then drizzle with olive oil and balsamic vinegar (we didn’t, but you can add salt and pepper to taste). Perfect for summer!

thai-basil-chicken

4. Thai Basil Chicken: Of the 4 recipes I’ve posted here, this one was probably the most involved, but it definitely isn’t as hard to make as it might seem! We adapted this Foodie Crush recipe, and the dish turned out really well—we’ll definitely be making it again!

So there are my 4 easy recipes… How do you use herbs in your cooking?

Where We Ate: The Happy Hooker, Moo Milk Bar, Fishbar, and 416 Snack Bar

The Victoria Day long weekend + our 2nd wedding anniversary have made this weekend a downright splurge-on-food long weekend… we’ll really need to be on our best behaviour this coming week! We kicked off the weekend with dinner at Auberge du Pommier, one of our faves. Some of our other eats:

The Happy Hooker

Small space with a simple menu, but affordable and perfect for grabbing a quick bite! The lobster roll was good, but I think the hot lobster roll with butter at Neptune Oyster in Boston has set the bar really high for all the lobster rolls in our future. The fish in both the tacos were by far the highlight of our meal at The Happy Hooker.

What We Ate
  • Mahi mahi and Cali baja tacos
  • Lobster roll
  • Baja fries

The Happy Hooker
Happy Hooker on Urbanspoon

Moo Milk Bar

Not to be confused with Momofuku Milk Bar (which we still haven’t tried yet, here or in NYC), Moo Milk Bar is located in The Beaches and is a cute little bakery with fresh cookies, flavored milk, and other sweet treats. Matt and I headed there after seeing this Toronto’s Finest Instagram post on Moo Milk Bar’s ice cream sammies. Their cookies are pretty darn good, but the flavoured milk was a bit disappointing (the banana chocolate milk mostly tasted like banana).
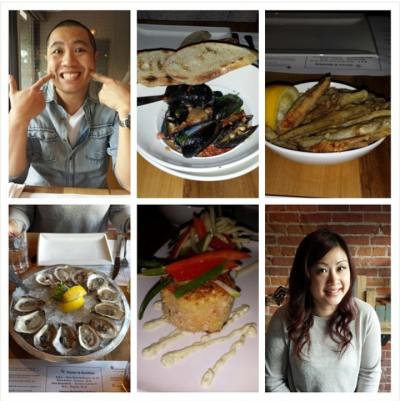
What We Ate
  • Ice cream sandwich (red velvet cookie with chocolate chip cookie dough ice cream)
  • Cookies (cookies & cream and caramel ganache)
  • Banana chocolate milk

Ice Cream Sammy!Milk and Cookies

Moo Milk Bar on Urbanspoon

Fishbar

The last time we went to Fishbar, we only had oysters and drinks because we’d already eaten dinner. This time, we got to try a few other dishes, which were really yummy! They were offering oysters at happy hour prices, which was great, but the fried smelts and mussels were our picks.

The only downsides to the meal were the slow service (which some reviews on Yelp have echoed)—some of our orders were mixed up or forgotten, and our empty water glasses were never refilled throughout the meal—and the couple next to us. The guy was clearly a person who thought he knew everything about everything and was not afraid to voice it… constantly. He also kept getting out of his seat, walking across to the other side of the table, and cuddling his date (Matt was convinced that he was doing it just to cop a feel). It was so bad that at the end of the meal, Matt practically ran out of the restaurant!

What We Ate
  • PEI mussels in a tomato chorizo sauce
  • Fried lake smelts with sea salt and lemon
  • Oysters (Malpeque and Acadian Gold)
  • Crab cakes with an apple and jalapeño slaw

Fishbar

Fishbar on Urbanspoon

416 Snack Bar

After dinner, we decided to head out for drinks. This was only our 2nd time going to 416 Snack Bar, but both times, we had the luck of sitting at the bar right where we could see the food being prepared. It’s almost mesmerizing! That and the good service, solid music, and casual vibe made it a good way to end the night!

What We Ate
  • Foie torchon with mini toasts
  • The mini Reuben sandwich
  • Korean fried chicken
  • The small board (which, this time, consisted of a lettuce wrap, battered shrimp, sausage, cheese, and taro chips)

416 Snack Bar
416 Snack Bar on Urbanspoon


A TON of good eats this weekend, but as I said, we’re going to have to pay for it! We don’t want to forget our commitment to being healthy, so we’re getting back on the squat challenge and trying to head outdoors again if the weather cooperates. Time to work all of this food off! ^^’

Where We Ate: Bonjour Brioche

There are plenty of great brunch places in Toronto, but most of them don’t take reservations (why can’t they all just be on OpenTable?) and seating is always limited. This means that you’re pretty much guaranteed a long wait if you A) don’t go early enough, B) don’t have everyone in your party there, and/or C) have more than a group of 4.

Bonjour Brioche is no exception, but to echo some of the reviews I’ve read, it was worth the wait. I could have done without the attitude from the lady who seemed like the manager/owner, but I had a great time with the girls, the food was delicious, and our server was really nice and attentive.

What We Ate

Latte Bowls: Clearly the best way to start a Sunday morning!

wpid-20140504_112106_1.jpg

Half Peameal Bacon and Half Avocado-Tomato Eggs Benedict: I loved that our server suggest that we do the half meat, half veggie option. The benny was served on croissant, with a side of greens and a yummy baguette. Delicious!

wpid-20140504_114041_1.jpg

Croque Madame: I would’ve gotten this in a heartbeat if I didn’t want to their famous croissant… ham, Gruyère, egg, and brioche? What’s not to love?

wpid-20140504_114054_1.jpg

Tarts: I bought two of their amazing tarts (crème brûlée and lemon curd) to take home, and they did not disappoint!

wpid-20140504_131334_1.jpg

Bonjour Brioche on Urbanspoon

All in all, a perfect way to spend Sunday. It would have been even better if the Raptors didn’t have that heartbreaking loss in Game 7, but our boys still did good this year… there’s always next year!

Where We Ate: Bar Isabel

Bar Isabel has been on our to-do list for a while, but it’s now on everybody’s radar (especially after being named by Air Canada’s enRoute magazine as the No. 1 Best New Restaurant in 2013), so getting reservations hasn’t been easy. Matt called over a month in advance to get us in!

The restaurant definitely lived up to expectations, both in terms of food and service. And while they have a decent-sized space, they haven’t crammed it full of tables, so everyone is nicely spread out. For the amount we ordered, it also wasn’t that pricey—between 4 people, we had 7 beers, 11 small plates, 1 main, and 2 desserts, and it only cost us $75 each including tax and tip!

What We Ate

Everything was really good, but my faves are the ones in bold purple below. I would go back JUST for the basque cake alone. The right amount of crispy on the outside and perfectly soft on the inside. A must try!

wpid-img-20140419-wa0011_1.jpgwpid-img-20140419-wa0007_1.jpg

wpid-img-20140419-wa0010_1.jpg wpid-img-20140419-wa0005_1.jpg

wpid-img-20140419-wa0004_1.jpgwpid-img-20140419-wa0008_1.jpg

To Start

  • Marinated Sardine Montaditos
  • Grilled Mushroom Montaditos, Chicken Liver Mousse, Jamón Ibérico, Wild Onion 
  • Chips, Boquerones, Piquillo, Jalapeno
  • Coca Flatbread, Caramelized Onions, Torta Del Casar, Rosemary
  • Roast Bone Marrow
  • Morcilla Scotch Egg, Hollandaise, Blonde Frisee
  • Patatas Bravas
  • Albacore Tuna Tiradito, Asian Pear, Celery, Jalapeno & Fried Rosemary
  • Wild Leeks, Ham. Smoked Egg, Torta Del Casar Sauce
  • Chorizo Verde with Marinated Escarole
  • Spicy Fried Squid, Crispy Tongue, Kale

Main

  • 1/2 Grilled Octopus

Dessert

  • Basque Cake and Sherry Cream

Overall, a great meal, and definitely worth the wait!

Bar Isabel on Urbanspoon

Lemon Yogurt Cookies…Turned Muffin Tops

While I have some great bakers in my life, I’m not one of them. I prefer cooking more, just because baking is such a science—it requires a lot patience and precision. A slight misstep in measurements, ingredients, temperature, or technique can completely change the outcome, which is what happened to me today!

I was randomly in a baking mood, so I decided to bake lemon yogurt cookies based on this recipe from Welcome Company. I’m not sure if it’s because I halved the recipe, if I under- or over-mixed the ingredients (after my electric hand mixer went berserk and I had to do it by hand), or something else, but my cookies ended up as muffin tops! 😮

Fortunately, they’re still delicious and perfectly lemony. And to be fair, I recently gushed about the abundance of muffin tops sold in coffee shops in Boston. So when life hands you lemons… make lemon yogurt muffin tops! 😉

Lemon Yogurt Muffin Tops

Ingredients

  • 1¾ cups of all-purpose flour
  • 1 tsp of baking powder
  • ¼ tsp of baking soda
  • 1 tbsp of lemon zest
  • ¼ tsp of salt
  • ¾ cup of sugar
  • ½ cup (1 stick) of butter
  • ½ cup of lemon yogurt
  • 2 tsp of fresh lemon juice

Note: The measurements are based on what I did, so if you want to play it safe, I’d go with the recipe mentioned earlier!

Directions

  1. In one bowl, mix flour, baking powder, baking soda, and salt together.
  2. In another large bowl, cream/beat the sugar, butter, and lemon zest until the mixture is light and fluffy. Add and beat in the eggs, one at the time. Finally, mix in the yogurt and lemon juice.
  3. The flour mixture can then be gradually added and incorporated into the wet mixture.
  4. Scoop spoonfuls of the mixture 2 inches apart on a cookie sheet/tray (I used parchment paper, but you can use a silicone baking mat or grease the pan).
  5. Bake at 350ºF for 15 to 20 minutes or until just a light golden brown around edges.

*The original recipe involved smaller-sized cookies (teaspoonfuls of the mixture), so the baking time was shorter (~10 to 12 min.)